Figuring

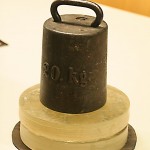
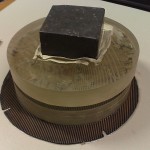
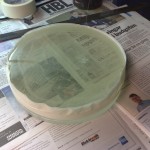
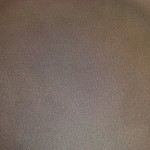
After a few (2-3) more hours of polishing with the full-size lap the mirror was fully polished. No holes or marks can be seen in the mirror surface with an upside-down 25mm eyepiece. Final polishing progressed rapidly when we used a weight (4-6 kg) on top of the mirror/tool.

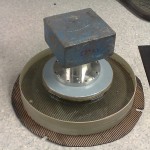
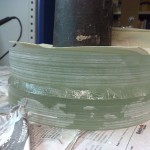
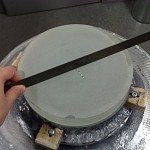
The following task is called figuring, where the surface is taken from a sphere to a praboloid. Following advice from experienced mirror makers we are doing this with a smaller pitch-lap which is about 60% of the diameter of the mirror. We're using W-shaped strokes mostly in the middle of the mirror.

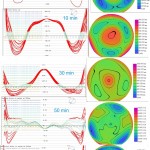
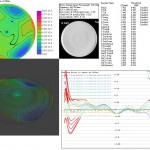
This picture shows the progress over a few 10 min or 20 min figuring sessions, with measurements taken after each session.

The main difference between a sphere and a praboloid is evident. The paraboloid is deeper in the middle, so the error plots above show a 'hill' at the centre which needs to be polished down. The top four measurements are single measurements and show a significant amount of distortion with three lobes at 120 degrees apart. I'm not sure where this originates yet. The final measurement at the bottom is an averaged one where we turned the mirror 90 degrees between each measurement, and shows little or no hills or valleys at 120 degrees apart. We are now at 1/17 wave rms error, which seems OK. The mirror is still too high at the very edge, along an 8mm wide strip in from the edge, which we will try to correct tomorrow.

Sunday polishing

Out pitch-lap is one that really doesn't work when polishing mirror-on-top. Should have realized that yesterday. The first two 20min sessions today were spent making the shape of the mirror worse, before we switched to tool-on-top for the last 30min + 30min. Suddenly it all goes much better, and we are back to a nice better than 1/10 wave sphere. We still see small dots from a laser-pointer reflection, so it's not time for figuring just yet.

The graph shows the wavefront error in nm, compared to a sphere. The Foucault images on the left are simulated from a zernike fit to the surface measurement.

Polishing continues

Something must have been wrong with the pitch-lap on Friday, since we began today with a strange bump in the middle of the mirror. The picture shows how the shape of the mirror (actually the wavefront, compared to a sphere) changed through today's polishing session. Slowly getting back to a good spherical shape. Hopefully the mirror will be polished out soon and we can start figuring it into a paraboloid.

Wooden telescope tube

First I had some composite ideas for the telescope tube, but after looking at examples and guides for 'Coopered' wooden tubes here and here, I decided it was quicker and cheaper to forget the carbon fiber.

Materials:

  • Four 3 m lengths of 28x90 mm Aspen (Puukeskus). (This stuff is meant for the bench in a sauna!)
  • PU-glue (Puukeskus)
  • 150mm diam. tube-clamps (10 pcs) (Biltema)
  • 50mm wide masking tape (2 rolls) (Biltema)
Methods:
  • Cut the 3m lenghts in half for a 1500mm long tube.
  • Locate a nice big table-saw, one where the blade can be angled accurately.
  • Cut six ca 10.5x28 mm strips from each 88mm plank. That makes for 48 strips. We'll need only 40 for the tube, but it's good to have some spares.
  • Angle the blade at 4.5 degrees, and cut one side of each strip with this setting.
  • Adjust the table-saw to produce 23 mm wide strips, and cut the other side at a 4.5 degree angle.
  • You've now cut each strip at least three times. Thats at least 144 cuts with the table-saw. If you're an office-rat like me you will have had more than enough of the noise and saw-dust for a few months onward. Have a shower and go to sleep.
  • With the narrow side facing down, align 40 strips on the floor, and exchange any bent or bad ones with the eight spare ones. Tape it all together, I did it first across and then along the seams.
  • Turn the strips over, and apply PU-glue to the seams. I used a small round plastic rod under the strips so the seam to be glued opened up slightly for easier access with the glue-bottle. (remember to wear working clothes and gloves. PU-glue is nasty stuff.)
  • Roll it into a tube, remember to apply glue to the final seam, then apply the tube clamps (which previously have been connected pair-wise end-to-end to produce 295mm diam. tube-clamps).
  • Check that the tube is round. Leave to set overnight. (More to follow as progress is made...)

Secondary mirror holder

These are the first useful parts made on the lathe. This will become the secondary mirror holder on the Newtonian telescope we are making. The secondary mirror is elliptical with a minor axis of 50 mm, so these parts are 50 mm in diameter. There is a spring-loaded M6 bolt that pulls the mirror holder upwards, while three M4 adjustment-screws placed 120 degrees apart push down on the holder. The 45-degree cut turned out surprisingly well straight from the metal band-saw, and I'm not going to sand or polish it since there is going to be plenty of silicone glue between the holder and the mirror anyway. The plan is to use three or four M3 threaded rods for 'the spider' which attaches this holder to the telscope tube.

Making a Pitch Lap

Fine-grinding of the mirror has progressed without problems. Around 1.5 hours of work per grit-size was enough to achieve a uniform surface roughness. After the finest grit, 15 micron Aluminium oxide in our case, it's time to polish the mirror using a Pitch lap and cerium oxide.

We heated around 500g of pitch on an electric plate. Note the tube that sucks away the fumes (normally used when soldering). Pitch is an interesting material to play around with, hard and brittle when cold, almost as runny as water when hot, and all kinds of viscosities and 'feel' in between. The mirror and glass tool were heated in an oven to around 65 C and a dam of paper masking tape was added to the tool. After pouring the pitch we waited for it to cool a bit and then made some channels using a steel ruler. Then the lap was pressed, mirror on top, with water and soap covering the surfaces to avoid sticking. Finally when the lap had cooled using a sharp knife the edges were bevelled and the channels re-opened.

About 10 hours of polishing now follows...

Rough grinding continues

Started out this evening with a 1 mm sagitta on the 240 mm mirror.

Started with no60 carborundum and ca. 20 + 30 min of grinding, which got us down to a 1.9-2.0 mm sagitta. The picture shows a 2.0mm drill bit under a steel ruler used for measuring the sagitta. The surface of the mirror is quite rough and appears white when dry.

Switched to no80 carborundum. Grinding is now much smoother with the mirror gliding easily across the tool with less sticking events. After about 30+30 min of grinding we are down to a 2.3 mm sagitta. A quick-and-dirty test shows around a 3 m radius of curvature. Surface now smoother to the touch, still white when dry.

Next stop: build a Focault-test/Ronchi-test jig to properly measure the focal length and the shape of the mirror (see for example plans here). Think about moving down to no150 carborundum.

Mirror grinding

To keep the mirror edge from chipping and breaking we are putting a bevel on it. Most guides tell you to do that with a sharpening stone which is made from carborundum bonded into a stone-like material. I thought doing the bevel by hand with the stone was much too slow, so I tried it with a diamond-bit on a dremel:

This works much faster and a 1-2 mm bevel can be made in a few minutes. After the bevel grinding you see our 'grind-o-matic' machine. It's driven by a 90 W DC motor with a 30:1 gear-head connected to a 12 mm steel axle which supports an aluminium disk on which the mirror or tool sits. There's a sheet of plastic to keep the wood and floor dry.

After about 2 hours of grinding with nr. 60 carborundum we achieved 1 mm of sagitta. A drop of glycerol in the grinding slurry helps to avoid stiction between the mirror and the tool. For a 240 mm diameter F/6 mirror the target sagitta is 2.5 mm so there is still some work to do.

Starting to build a 240mm Newtonian

More aperture is better. I've started to build a 240 mm Newtonian with some mirror blanks from Tammilasi and knowledgeable help and grinding materials from Teknofokus.

The first task was to grind the 240 mm diameter (40 mm thick) borosilicate mirror blanks flat on each side. This took around 1.5 hours per side using 60-grit silicon carbide and grinding against a flat steel plate.

See also mirror grinding video by The Sky at Night/BBC.