
Thinkpad T40p
Verkkokauppa.com:s 199 euro offer for a 2-year-old refurbished Thinkpad T40p proved irresistible, and I was lucky to pick one up after queuing outside for 35 minutes. The place opens at 9, I arrived around 8:55, but some people had apparently been outside the doors waiting already at 7:30! The 19 euro mobile phones sold out before I made it inside.

A quick look inside, tightening some loose bolts, and dusting it off with compressed air. Should make a nice second laptop (autoguiding for astrophotography, chart-plotter on a boat, or similar)
Rubinar 500/5.6

I've bought a second hand Rubinar 500/5.6 . The plan is to use it for auto-guiding my EQ6 mount using something like the QHY5 camera, but the lens should also be fun to play with for normal telephotography.
Miloslav Druckmuller has a good example of astrophoto-use for this lens, and there are many more examples on flickr.
Wooden telescope tube
First I had some composite ideas for the telescope tube, but after looking at examples and guides for 'Coopered' wooden tubes here and here, I decided it was quicker and cheaper to forget the carbon fiber.
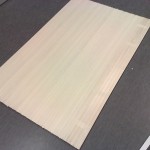
Materials:
- Four 3 m lengths of 28x90 mm Aspen (Puukeskus). (This stuff is meant for the bench in a sauna!)
- PU-glue (Puukeskus)
- 150mm diam. tube-clamps (10 pcs) (Biltema)
- 50mm wide masking tape (2 rolls) (Biltema)
Methods:
- Cut the 3m lenghts in half for a 1500mm long tube.
- Locate a nice big table-saw, one where the blade can be angled accurately.
- Cut six ca 10.5x28 mm strips from each 88mm plank. That makes for 48 strips. We'll need only 40 for the tube, but it's good to have some spares.
- Angle the blade at 4.5 degrees, and cut one side of each strip with this setting.
- Adjust the table-saw to produce 23 mm wide strips, and cut the other side at a 4.5 degree angle.
- You've now cut each strip at least three times. Thats at least 144 cuts with the table-saw. If you're an office-rat like me you will have had more than enough of the noise and saw-dust for a few months onward. Have a shower and go to sleep.
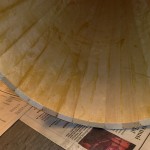
- With the narrow side facing down, align 40 strips on the floor, and exchange any bent or bad ones with the eight spare ones. Tape it all together, I did it first across and then along the seams.
- Turn the strips over, and apply PU-glue to the seams. I used a small round plastic rod under the strips so the seam to be glued opened up slightly for easier access with the glue-bottle. (remember to wear working clothes and gloves. PU-glue is nasty stuff.)
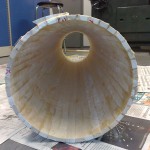
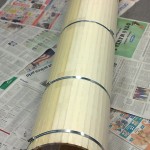
- Roll it into a tube, remember to apply glue to the final seam, then apply the tube clamps (which previously have been connected pair-wise end-to-end to produce 295mm diam. tube-clamps).
- Check that the tube is round. Leave to set overnight. (More to follow as progress is made...)

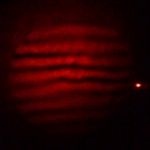
Interferograms

This is how the interferograms from the Bath interferometer look like. Using either fringe-tracing or Fourier transform-based analysis it is possible to calculate the shape of the mirror. The most popular analysis programs seem to be FringeXP and OpenFringe.

Bath Interferometer
Most interferometer types used for optical surface testing require an expensive reference element from which the reference beam is bounced off. The interferometer then compares the wavefront from the reference element to the wavefront from the surface being tested. The Bath interferometer is a clever design which uses the test-mirror for both the reference beam and the test-beam. It's very simple to build, requiring just a laser, a 50/50 beamsplitter, a mirror, and a short focal length lens to expand the beam.
Here's my first attempt at building one, and taking pictures of interferograms from the 240mm telescope mirror we are polishing. The video shows how unstable the fringes are with the interferometer on a normal (wobbly!) table and in a typical open room with lots of air-currents. Moving to a better table and protecting the beam-path from air-currents with cardboard boxes should make for more stable interferograms which can be quantitatively analysed.
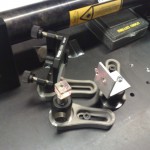

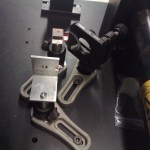

Secondary mirror holder

These are the first useful parts made on the lathe. This will become the secondary mirror holder on the Newtonian telescope we are making. The secondary mirror is elliptical with a minor axis of 50 mm, so these parts are 50 mm in diameter. There is a spring-loaded M6 bolt that pulls the mirror holder upwards, while three M4 adjustment-screws placed 120 degrees apart push down on the holder. The 45-degree cut turned out surprisingly well straight from the metal band-saw, and I'm not going to sand or polish it since there is going to be plenty of silicone glue between the holder and the mirror anyway. The plan is to use three or four M3 threaded rods for 'the spider' which attaches this holder to the telscope tube.

IOM sail camera videos
Looks like the mast bends to leeward at the middle, while the top of the mast stays in place. I don't think that's a good thing. Should try lower shroud attachment point and maybe shorter spreaders.
Remember to turn up the sound so you hear the wind, water, and the RMG winch! Also try these in higher quality by going to youtube and clicking "watch in high quality".
Here's how the camera looks on the foredeck:

Cassiopeia

17-40/4L lens set to 17mm and F/5.6. A stack of 20 exposures, each 60s (20min total exposure at iso800). See also here.

Pleiades (M45)

The Pleiades shot with a Canon 20D and a 70-200/4L set to 73mm and F/5.6. A stack of 30 expousers, each 20s at iso800 (total exposure 30x20s = 10min). Unguided EQ-6 mount.