(click image for high-resolution version)
The current Noux Mk2 construction is obviously too difficult to put together. There are lots of separate mouldings that need to be fit and bonded to the hull, lot's of sanding, filling, and painting. So I'm trying to think of a simpler design that would be easier to build. With all the moulds and jigs ready my dream would be to spend one whole day on moulding: hull, deck, fin, rudder, etc. Go home and sleep/do other things while everything cures for a day or two, and then spend the next day bonding together the components. With about two full days of work I would hope to create a ~500 eur kit which can be handed to an intermediate to advanced IOM-skipper which he/she could then complete by adding fittings, radio, and rigs. Is this Utopia?
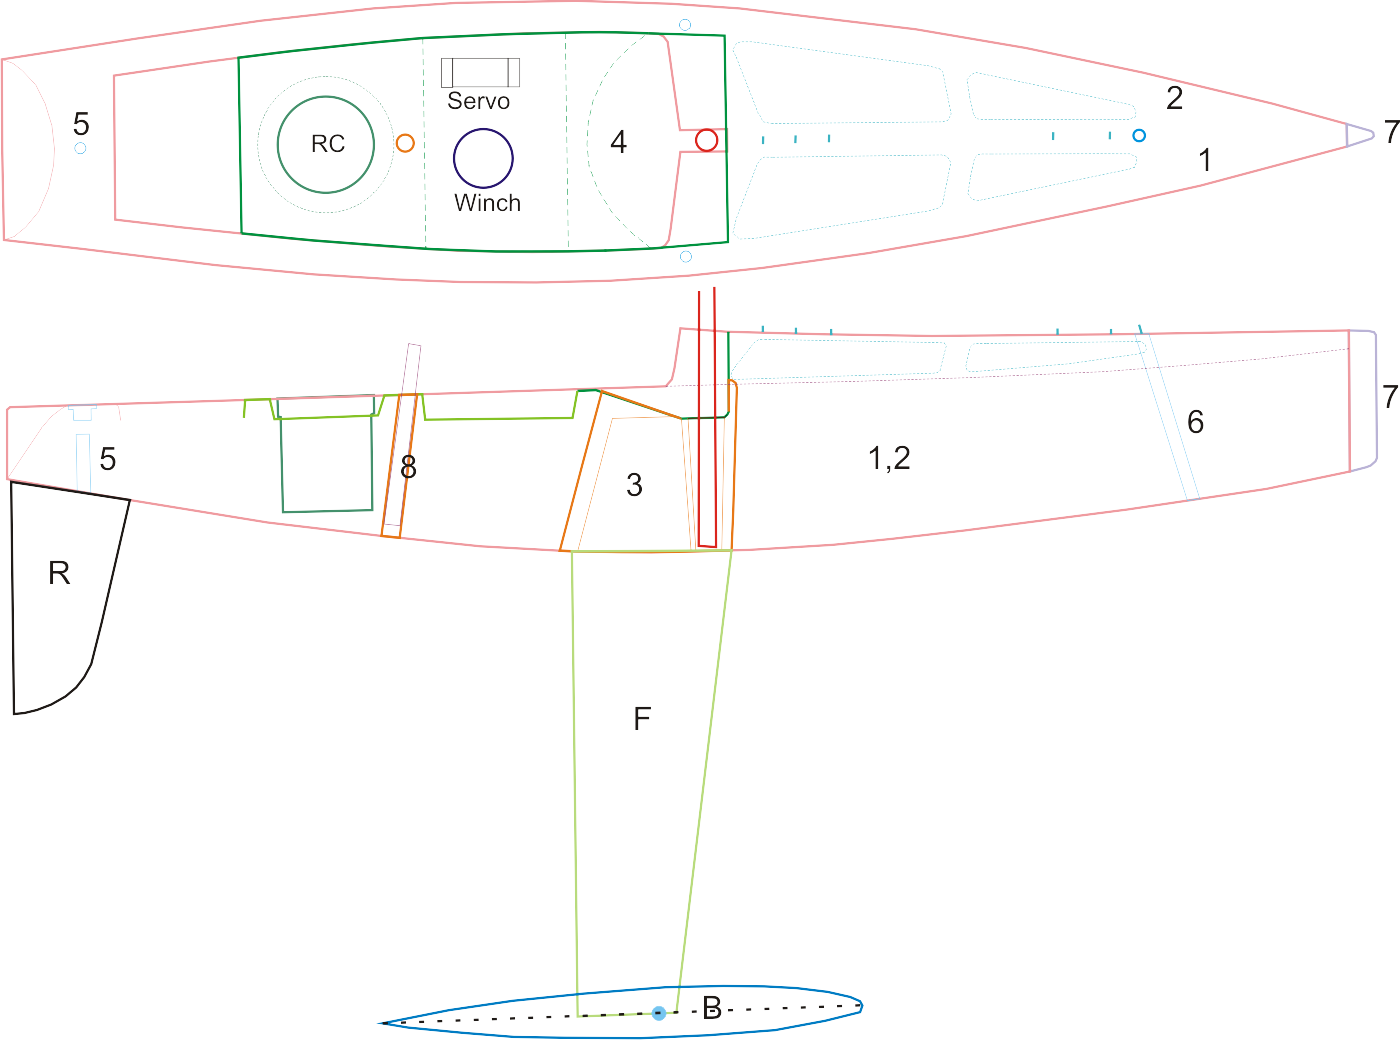
The Bantock/SailsETC style of construction (Topiko-ish drawing above) simplifies building somewhat. The two halves of the hull (1,2) are moulded separately and then joined. A separate fin/mastbox laminate (3) needs to be bonded into place while the hull is in a jig, to keep everything nice and straight. The foredeck comes 'for free' in the hull moulding process, but the aft deck (4) is a separate moulding. Here I've drawn a recessed flat part for mounting the winch and the servo, and a place for the 65mm RC-pot aft of the main-sheet post.
Then there are small bits and pieces like the rudder tube (5), the tube for the no1 rig (6), and the bow bumper (7).
Sails ETC sells a cheap plastic rudder (R), and some not-so-cheap fins (F). We can make bulbs (B) in lead by casting, or maybe in brass or steel by cnc-turning in the future.
I really feel the challenge is in components 1 through 4, the large mouldings that need to be accurately assembled, and apart from the finbox need to have a nice gelcoat outer finish. With the Topiko-style transom the two hull-halves (1,2) can't be assembled in the hull mould, so a separate hull mould without the inverted transom is needed. This assembly-mould/jig could also have a permanent hole for a dummy-fin that is put in place and aligns the separately moulded fin/mastbox (3). The aft-deck (4) would then be bonded in place with the help of strips of glassfiber plate glued to the underside of the hull-flange.
If I count the building tasks correctly I get something like this:
- Mould two hull-halves. (spray mould with gelcoat/paint, apply epoxy+2x125g glassfiber, trim glassfiber to mould-edge)
- Mould other components: deck, fin/mastbox, mainsheet-tube, no1-rig-tube, bumper (in silicone)
- Wait for everything to cure
- Assemble hull-halves in separate jig. bond together. Glue in fin/mastbox, Glue in deck (can this be done simultaneously with finbox?). Glue in rudder tube.
- Wait for everything to cure
- Finish by adding bits and pieces: open foredeck holes, glue in no1-rig tube, glue in mainsheet-post tube, attach bumper.
That's three tasks separated by curing-time. I'd be interested if anyone has some thoughts on this! Have I overlooked something big? Can this be simplified further?
I know some people have used closed-mould techniques with a pressurized balloon inside to mould complete boats in one go. But as there are no good descriptions of this online I'm not going to pursue that in the near future.
I have a set of Moulds for Kite(another Bantock boat) which are exactly as you describe. It is difficult to join everything together working in the confined space of the hull and pretty time consuming to get a good fit. To get anywhere near Ian Cole's perfect standard, inside and out will take me a long time to achieve so while the idea is attractive I am not sure that the Noux method isnt commercially better. Take a look at the David Creed kits for Gadget and Errica, he seems to have got the accurate kit idea pretty well sorted and at a reasonable price. Good luck!
Hi Anders,
I am one of two guys out here on the West Coast of Canada who are running a "Sweat Equity" program / project. Basically it is to promote IOMs and membership of the Canadian Radio Yachting Association. In effect we supply an IOM hull and deck kit (joined) ready to fit out and paint for a little over $100 Canadian for CRYA members. We are presently producing Graham Bantock's Kite and Vektor, Don Martin's MIOMI and two local designs - Tick Tock and FH. MIOMI and FH are passing through the final stages of prototyping how we will assemble them. They are being done a little differently from the other three. It is hoped to add another two designs to the program during the coming winter.
With the Kite, Vektor and Tick Tock we basically follow Graham's deck design. The hull and deck take about 90 minutes to mould from a prepared mould and pre-cut glass. The fin box and mast tube are prefabricated and the fin box bolted into the mould on its form and the hull moulded around it. The two components are joined in about an hour. All of the interior work can be laid out in the hull mould before decking or done through the lightening cut-outs. The fin box form is pulled after decking. The transon / counter is dished each of the designs and is formed during moulding the hull. The transom mould is removable from the hull mould to allow the removal of the hull from the mould.
The hull / deck assembly is done in a jig which is basically a moulding taken from the original plug from which the hull mould was taken. This is modified and set up so the hull can be worked on and the deck joined to it while being held in shape. It looks a little crude, but it is simple and it works just fine.
So I have the following questions - and they are not meant to be sarcastic
a) Why are you making life difficult by using the construcion method you appear to be using with multiple mouldings or split moulds. Is it because to wish to mould a rolled deck edge?
b) Is the aim to produce a ecconomic but competitive boat?
c) Can I borrow your CNC mill? - just kidding
Best regards,
Lawrie Neish
Val,
thanks for your comments. I've not built a boat that is split down the middle, and it may be just as hard as one that is split along the hull/deck join.
With the noux we have at least three pieces (hull, foredeck, aft-deck) which make up the boat in addition to the finbox/mastbox moulding. I'd like to reduce that number to 1 or 2 mouldings if possible, and be able to assemble all the components in 1 or 2 building stages.
Anders
Lawrie,
Many thanks for your informative reply. Do you have a website with some pictures and/or building guides for your designs? (If you have pictures and would like to write something about them I would be glad to publish them here)
a) with the Noux I copied the construction technique found on the Cockatoo which produces an foredeck which overlaps the cockpit. I'm not sure that this is really needed and Jeff Byerley's new Cockatoo-2 and Extreme designs use a one-piece deck without the overhang.
The Noux radio-installation basically copies the one on Craig Smith's new Obsession. It's fairly complicated to build, but does produce a compact and 'cute' radio-installation that only uses one hatch for the whole boat. I'm not sure this is the way to go for an economical boat.
How do you join the hull/deck? With the noux we use a 10x4mm wooden plank along the hull-edge and bond the deck to that using SP Spa-Bond epoxy glue. This requires to separate stages: first gluing in the plank and then gluing the deck - not very efficient.
b) Yes! My idea is to come up with a set of moulds and procedures that allows me or someone else with moulding skills to produce a kit-boat in reasonable time/effort. That would include the hull with deck, fin/mastbox, ruddertube, and other essentials. Simple things which won't screw-up the performance of the boat like adding fittings, radio-installation, and rig-building could be left to the kit-buyer.
SailsETC has the plastic rudder which is economican and OK performance wise.
SailsETC also sells fins which could be used, but both the top and bottom end of the fin requires much work to fit to the hull/bulb. Some new innovations needed here!
c) We're still in the process of upgrading the cnc-mill to servo motor control. When that is done I'd be happy to receive CAD-drawings of IOM-related things people would like to have milled. If I have a common interest in them I can quote them quite cheaply, if not the price might be similar or lower to what a purely commercial cnc-shop would ask for.
Anders
As the other half of the two that Lawrie alluded to I have a load of photos and documentation I would/will send to you.
My contribution to the effort has been sort of the promotion/help side of it to the extent that I have built 3 of the boats now and will build up the prototypes of our "new" boats for testing.
If you can give me an email address where I can send you a reference to the service I use to send large files I'll send you what is probably way too much info and pictures that you are welcome to use any way you want. Just send me a note to the email address attached to this reply and I'll get that stuff coming your way.
-Barry
Hi Anders,
you have left out an additional moulding. It is a u shaped moulding which runs the lenght of the fordeck and is bonded there for extra strenght
Daniel
Dear Sir
Nice work and very usefull information. Thanks for sharing.
I would like to build a similar kind of boat. One big question that I have concerns the sails. I supose that is not just "to cut a triangle". How do we curve the sail surface? Where can I find detailled information?
Thanks
C. M.
Hi CM,
I've not built sails myself, but I understand most people build sails on some kind of 3-dimensional jig or mould.
Lester Gilbert has some thoughts on this on his site:
http://www.onemetre.net/Build/Sailmake/Sailmake.htm
Anders
Anders, I saw an interesting deck moulding on an M at the weekend which allows you to have a mast gate without a fordeck overhang so if applied to an IOM would give you a one piece deck. I havent processed my pics yet but if I have one I'll send it on